Is er iemand die ervaring heeft met het vervangen van de carterpakking.
Liefst zonder de motor eruit te halen, ik begrijp dat de rechter draagarm er af moet. Daar ben ik nog mee bezig 1 bout zit nog vast. In het weekend ga ik zagen.
Volgens Lazlo moet het mogelijk zijn de motor rechts te laten zakken en dan de pakking met ijzertjes erin. Ik heb de originele van Carjoy aangeschaft.
Heeft iemand hier ervaring mee en tips?
Groet,
Bram
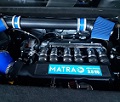
carterpakking 2.2 vervangen
-
bramurena

- Posts: 7
- Joined: Sun Feb 02, 2014 12:30 pm
- Location: Uden NL
-
oetker

- Posts: 7987
- Joined: Mon Jan 07, 2008 11:31 pm
- Location: Opheusden NL
- Contact:
Ik zou je adviseren de motor er geheel uit te halen en gelijk de pakkingen en seals aan de rechterkant mee te nemen.
Tevens als de waterpomp erg oud is deze te reviseren.
De rechterkant is moeilijk bereikbaar.
Roy Gilliaard de Engelse matra specialist heeft dit ook fijntjes beschreven in zijn faQ.
=========================================================
Copy/paste.
My Murena 2.2 sump gasket is leaking. How do I change it?
The sump gasket is special on the Murena 2.2 and MUST have metal spacers in the gasket. So they are expensive for a reason. There are many incorrect ones listed so beware that even manufacturers sometimes list the wrong type. e.g. BGA list the Tagora gasket for the Murena - WRONG. Do not fit any Tagora gasket as it will not last any time at all.
First of all, if you examine the installation, the engine is mounted, not on the block like most cars, but on the sump and the gearbox. So think about it. Since the engine is mounted on the sump not the block, the engine must be rigid with the sump. Especially since the gasket is cork. If you only have a soft gasket (whatever type) it will soon get damaged by the power unit movement, and it will be leaking again in no time. So don't try to use the Chrysler 180/2-litre/Tagora sump gasket.
You can't simply drop the sump off to replace it, without making alternative arrangements to suspend the engine! Since the long (RH) driveshaft runs in a bearing held in a non-removable sump casting, it has to be slid out which involves removing the RH trailing arm. If you decided to do the job, leaving the engine in and suspending it, before you drop the sump, you should remove the oil level sensor otherwise it is likely to get damaged, and they are no longer available.
However, I have usually found that not only is the sump gasket leaking, but the timing case seal is often leaking too. Taking off the lower timing case involves removing the water pump and crankshaft pulley, and the sump mounting normally gets it the way of the latter, but as you are removing the sump, you might think this is now the time to do it. But removing the water pump means tilting the engine away from the RH inner wing, which is more difficult when you have the engine suspended. You have to release the gearbox mounting and lower that end, and what you now have suspended is no longer just the engine, but the complete powertrain! And you must remove the original air box on a Prep 142 or S, if still fitted, otherwise it will foul the fuel tank. Finally, removing the crankshaft pulley and the lower timing case whilst the engine is temporarily suspended in the engine bay, is not particularly easy either. Also, while you are fixing oil leaks from the engine, you need to check and make sure it is not leaking from the rear seal behind the flywheel. This is not a lip type seal as with more modern engines, but a cord type seal set into a rear block housing cap; with a reverse scroll and thrower on the crankshaft to deflect oil away from it. (This is similar to old BMC engines if you have ever worked on them.) If you do have an excess leak at this point, then you have to remove the crankshaft to fit new cord seal halves, so you can see the job becomes one where removing the engine is definitely the easier option!
This is why I normally recommend you take the complete unit out. Yes, it becomes an even bigger job, but not by much, and you will be able to work on it much more easily, and you will be able to see ALL the things that need doing, and do them in one complete job.
The bolts are torqued up on the metal spacers, and the gasket forms the seal but does not take the load. This is why the sump gasket is special to our car and costs a little more. When the original supply of Murena 2.2 sump gaskets ran out, I had some more made up by Cooper-Payne but without the spacers - just the holes to take the spacers. You simply transfer them across from the old gasket to the new one.
=======================================================
Het is een stevige klus en die draagarmen geven echt niet mee.
Zoals altijd roep de ene klus de andere op in dit geval.
Mijn motor is ook niet helemaal lekvrij, en de olie zit wel rond de pakking aan de onderzijde, maar komt vaak ergen anders vandaan.
Kan zelfs bij de koppakking lekken.
Het is zaak dat goed te bekijken voor je dit doet en dan moet de motor er gewoon uit.
De pakking is trouwens in clubstok.
Zonder de spacers maar die kun je van de oude gebruiken.
Herman
I feel like Jonah, only my fish looks different.
Matra Murena 1.6 1981. Nissan Leaf EV
Matra Murena 1.6 1981. Nissan Leaf EV
-
matramurena
- Posts: 838
- Joined: Wed Sep 14, 2005 11:09 am
- Location: Sundet, Lillesand, Noorwegen
- Contact:
Motor uitbouwen is makkelijker dan je mag verwachten. Draagarm heb je toch al los.. Je kunt dan een dikke balk boven het blok plaatsen links en rechts steunen op het chassis van de Murena. Hier twee gaten in en daar een draadeind doorheen steken met een grote ring en moer erop. Aan de andere zijde een oog waaraan je het blok met een strop vast kunt maken.
Nu kun je vrij precies het blok optillen en laten zakken door de moeren aan/los te draaien...
Succes!
Nu kun je vrij precies het blok optillen en laten zakken door de moeren aan/los te draaien...
Succes!
Martijn
1983 Matra Murena 3.0 V6
2008 Lancia Phedra Emblema 2.0 Hdi
2018 VW Golf GTE
1980 (?) Tunejolle 16, Mercury 60 EFI
1984 Happy 27 zeilboot. Volvo Penta MD5B
1983 Matra Murena 3.0 V6
2008 Lancia Phedra Emblema 2.0 Hdi
2018 VW Golf GTE
1980 (?) Tunejolle 16, Mercury 60 EFI
1984 Happy 27 zeilboot. Volvo Penta MD5B
-
bramurena
- Posts: 7
- Joined: Sun Feb 02, 2014 12:30 pm
- Location: Uden NL
Dank.
Wist niet dat je de motor onder de murena uit kunt laten zakken, dat maakt het wel een stuk makkelijker. De linker achteras heb ik al eens losgemaakt om de draagarm te behandelen, het ringetje heb ik toen niet teruggezet dus die gaat er makkelijk uit.
Ga toch overwegen om de motor op deze manier te laten zakken, dan kan ik ook makkelijker bij de aansluiting van de startmotor. Die draait zwaar rond, kan ook aan de corrosie liggen op de aansluitingen en aardstrip achter.
-
brinkie

- Posts: 348
- Joined: Tue Jun 15, 2010 12:35 pm
- Location: Houten NL
- Contact:
De aansluitingen van de accu zeker bekijken. Ik dacht laatst dat ik een nieuwe accu nodig had, bleek gewoon een van de aansluitingen niet meer goed contact te maken. Nu start 'ie weer als een zonnetje.bramurena wrote:Ga toch overwegen om de motor op deze manier te laten zakken, dan kan ik ook makkelijker bij de aansluiting van de startmotor. Die draait zwaar rond, kan ook aan de corrosie liggen op de aansluitingen en aardstrip achter.
Robert
ex Matra Murena 2.2 uit 1981 in Rouge Mephisto.
Volvo 480 GT uit 1994 in Vase Green metallic.
ex Matra Murena 2.2 uit 1981 in Rouge Mephisto.
Volvo 480 GT uit 1994 in Vase Green metallic.